Tuesday, August 30, 2011

Individual Strawberry Peach Cobblers

I love all of the fresh produce that comes with the summer season, especially berries. They are extra plump, sweet, and juicy. Irresistible even. I made this recipe last summer just to take advantage of the season's produce. It is just delicious. Warm sweet strawberries and juicy peaches layered between flaky homemade crusts, and a dollop of sweetened whipped cream never hurt.


If you've never tried the combination of strawberries and peaches before- it is time! This recipe has confused some people just because it's mixing a berry and a stone fruit. Not just berries work well together- I also love the combination of nectarines and blueberries too! These mini cobblers really highlight the flavors of the summer season. I don't like to add too much sugar to an already good thing, like a summer berry or sweet peach. This cobbler recipe only calls for 1/4 cup of sugar, unlike other traditional cobbler recipes I've tried that have over 4 cups of added sugar. The fruit just doesn't need it. It's so delicious and perfectly sweetened- I promise.


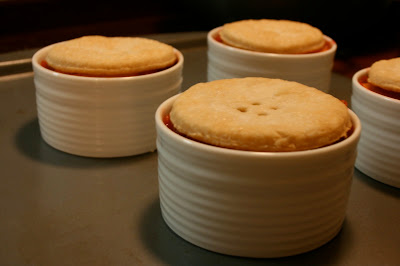
This recipe is quite simple. It makes 4 individual servings and isn't very fussy. I've made delicious cobblers before that require extensive rolling of pastry and a long time in the oven- this is not one of them. Plus they look cute- little fruit filled ramekins topped with a button of crust.


Easy to make, hard to NOT look at, fun to share, and enjoyable to eat. Give these cuties a try before summer ends. 

Individual strawberry peach cobblers.


Inividual Strawberry Peach Cobblers
Serves 4

Fruit filling:
4 regular size peaches
1 package strawberries
1/4 c. sugar
1 T flour
1 t. pure vanilla extract
3T water

Crust:
1/4 c. cold water
1/2 c. all vegetable shortening
1 c. AP flour

Preheat oven to 400 degrees F.
1. Prepare crusts by cutting the shortening into the flour with a pastry blender until lumpy. Add cold water and combine until dough is sticky. Turn dough out onto floured surface, form into a ball, wrap tightly in plastic wrap, and refrigerate 15 minutes.
2. Roll dough out onto cold floured work surface to 1/4 inch thickness. Using your ramekin, punch out 8 circles. To punch out the "button holes" use a straw and discard extra dough.
3. Sprinkle the crusts with sugar and bake on a parchment line baking sheet for 10-15 minutes until very lightly golden.
Reduce oven heat to 350 degrees F.
4. To prepare the fruit filling peel and slice peaches and heat in a Dutch oven over medium heat with sugar, flour, and water. Cook about 5 minutes.
5. Meanwhile, hull and slice strawberries while the peaches soften. After 5 minutes or so, add the strawberries to the peaches and cook the fruit until all pieces are tender and the juice have become syrupy.
6. Remove Dutch oven from heat and stir in vanilla extract. It is important that this step be done after the fruit is removed from the heat in order to retain the fullness of the vanilla flavor.
7. Assemble the cobblers by layering a scoop of fruit in the bottom, topping with a crust, layering more fruit, and adding a final crust on the top. 
8. Bake cobblers for 15-20 minutes until crust is lightly browned. Serve warm with sweetened whipped cream and enjoy.

These beautiful Sophie Conran ramekins were a wedding gift from my husband's great aunt and uncle from England. I love their simple design.


Monday, August 29, 2011

Blue Velvet Cake

I know it's been done before, but blue velvet is just as impressive as red velvet. The richness of flavor from the buttermilk in combination with a slight hint of cocoa is unmistakable. Delicious.

Blue velvet cake with fading layers.
I made this cake for my brother and sister-in- law's going away party.  I made each layer a different shade of blue so that each slice had layers that faded from light to dark. It was pretty impressive. To achieve this look all I did was weigh out the batter evenly into 4 different cake pans, adding more royal blue food color gel to each pan. Each pan baked up perfectly flat, skinny, blue layers ready to be stacked and frosted with lots of smooth Swiss meringue buttercream- yum!

Blue velvet layers before baking.


Blue velvet layers after baking.
Blue velvet cake frosted in Swiss meringue buttercream.


Monday, August 8, 2011

Swiss Meringue Buttercream

Irish birthday cake made with Swiss meringue buttercream.
Cake decorating is an exciting thing for me- there's always something new to learn! As long as I've been decorating cakes, I've always used a traditional American buttercream made with either shortening, butter, or a combination of both, depending on the particular use, mixed with confectioners sugar, meringue powder, and flavored with vanilla extract. This frosting is not a bad one, and I've found that many people love it homemade. In the past few months though I've learned that American buttercream (AMBC) is not the only type of buttercream out there, and it's definitely not always the best option for decorating cakes.

Cake torted and covered in a light crumb coat.
Over the weekend I finally set aside some time to make Swiss meringue buttercream (SMBC). From what I've learned there are three main types of meringue buttercream: Swiss, Italian, and French. They are made with sugar, whipped egg whites, and lots of butter. The result in each is a very light, not overly sweet, and smooth frosting. The difference between the three is the method of preparation. As I said before I am just learning this, so I have only made SMBC, and let me tell you- it is nothing short of amazing!

Still working on achieving the perfectly smoothed look.
Irish birthday cake.
SMBC is SO smooth and tasty. It is not overly sweet, which I love, and it can be flavored in so many ways (which I am hoping to experiment with soon!) The recipe I tried is from baker and decorator, Jennifer Bratko who runs a successful cake business in san Francisco, From Scratch SF. She is very precise and accurate in her recipes, making them nearly flawless. I've read through many of her blog posts about cake, butter, frosting, and decorating. I always learn something new. Jennifer's recipe for SMBC is made by whisking sugar, egg whites, and salt over a double boiler until it reaches a temperature of 160 degrees F. It is then transferred to a stand mixer fitted with a whisk attachment and whipped on high until stiff peaks form. The last step is to add 1 pound of room temperature butter to the meringue and to fit the mixer with a paddle attachment. The butter and meringue need to be mixed on the lowest possible setting until the butter emulsifies with the meringue creating a super smooth and light frosting. Here is the link to Jennifer's recipe and tutorial. Don't be afraid to try this one out! It will definitely change your opinion on buttercream.

Smooth top and sharp edges.
Since it is difficult for my husband and I to eat a whole cake ourselves, I made this cake for the friend of a friend's birthday party over the weekend. It was simple white cake with a vanilla bean SMBC. Everyone loved it and said that it was the lightest creamiest frosting they've ever tasted, success! Besides being so tasty, SMBC is actually much easier to decorate with. It smooths out very quickly and easily, giving a nearly flawless finish and sharp edges.