Tuesday, August 30, 2011

Individual Strawberry Peach Cobblers

I love all of the fresh produce that comes with the summer season, especially berries. They are extra plump, sweet, and juicy. Irresistible even. I made this recipe last summer just to take advantage of the season's produce. It is just delicious. Warm sweet strawberries and juicy peaches layered between flaky homemade crusts, and a dollop of sweetened whipped cream never hurt.


If you've never tried the combination of strawberries and peaches before- it is time! This recipe has confused some people just because it's mixing a berry and a stone fruit. Not just berries work well together- I also love the combination of nectarines and blueberries too! These mini cobblers really highlight the flavors of the summer season. I don't like to add too much sugar to an already good thing, like a summer berry or sweet peach. This cobbler recipe only calls for 1/4 cup of sugar, unlike other traditional cobbler recipes I've tried that have over 4 cups of added sugar. The fruit just doesn't need it. It's so delicious and perfectly sweetened- I promise.


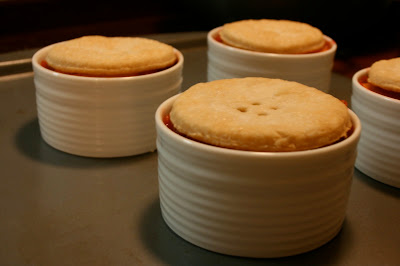
This recipe is quite simple. It makes 4 individual servings and isn't very fussy. I've made delicious cobblers before that require extensive rolling of pastry and a long time in the oven- this is not one of them. Plus they look cute- little fruit filled ramekins topped with a button of crust.


Easy to make, hard to NOT look at, fun to share, and enjoyable to eat. Give these cuties a try before summer ends. 

Individual strawberry peach cobblers.


Inividual Strawberry Peach Cobblers
Serves 4

Fruit filling:
4 regular size peaches
1 package strawberries
1/4 c. sugar
1 T flour
1 t. pure vanilla extract
3T water

Crust:
1/4 c. cold water
1/2 c. all vegetable shortening
1 c. AP flour

Preheat oven to 400 degrees F.
1. Prepare crusts by cutting the shortening into the flour with a pastry blender until lumpy. Add cold water and combine until dough is sticky. Turn dough out onto floured surface, form into a ball, wrap tightly in plastic wrap, and refrigerate 15 minutes.
2. Roll dough out onto cold floured work surface to 1/4 inch thickness. Using your ramekin, punch out 8 circles. To punch out the "button holes" use a straw and discard extra dough.
3. Sprinkle the crusts with sugar and bake on a parchment line baking sheet for 10-15 minutes until very lightly golden.
Reduce oven heat to 350 degrees F.
4. To prepare the fruit filling peel and slice peaches and heat in a Dutch oven over medium heat with sugar, flour, and water. Cook about 5 minutes.
5. Meanwhile, hull and slice strawberries while the peaches soften. After 5 minutes or so, add the strawberries to the peaches and cook the fruit until all pieces are tender and the juice have become syrupy.
6. Remove Dutch oven from heat and stir in vanilla extract. It is important that this step be done after the fruit is removed from the heat in order to retain the fullness of the vanilla flavor.
7. Assemble the cobblers by layering a scoop of fruit in the bottom, topping with a crust, layering more fruit, and adding a final crust on the top. 
8. Bake cobblers for 15-20 minutes until crust is lightly browned. Serve warm with sweetened whipped cream and enjoy.

These beautiful Sophie Conran ramekins were a wedding gift from my husband's great aunt and uncle from England. I love their simple design.


Monday, August 29, 2011

Blue Velvet Cake

I know it's been done before, but blue velvet is just as impressive as red velvet. The richness of flavor from the buttermilk in combination with a slight hint of cocoa is unmistakable. Delicious.

Blue velvet cake with fading layers.
I made this cake for my brother and sister-in- law's going away party.  I made each layer a different shade of blue so that each slice had layers that faded from light to dark. It was pretty impressive. To achieve this look all I did was weigh out the batter evenly into 4 different cake pans, adding more royal blue food color gel to each pan. Each pan baked up perfectly flat, skinny, blue layers ready to be stacked and frosted with lots of smooth Swiss meringue buttercream- yum!

Blue velvet layers before baking.


Blue velvet layers after baking.
Blue velvet cake frosted in Swiss meringue buttercream.


Monday, August 8, 2011

Swiss Meringue Buttercream

Irish birthday cake made with Swiss meringue buttercream.
Cake decorating is an exciting thing for me- there's always something new to learn! As long as I've been decorating cakes, I've always used a traditional American buttercream made with either shortening, butter, or a combination of both, depending on the particular use, mixed with confectioners sugar, meringue powder, and flavored with vanilla extract. This frosting is not a bad one, and I've found that many people love it homemade. In the past few months though I've learned that American buttercream (AMBC) is not the only type of buttercream out there, and it's definitely not always the best option for decorating cakes.

Cake torted and covered in a light crumb coat.
Over the weekend I finally set aside some time to make Swiss meringue buttercream (SMBC). From what I've learned there are three main types of meringue buttercream: Swiss, Italian, and French. They are made with sugar, whipped egg whites, and lots of butter. The result in each is a very light, not overly sweet, and smooth frosting. The difference between the three is the method of preparation. As I said before I am just learning this, so I have only made SMBC, and let me tell you- it is nothing short of amazing!

Still working on achieving the perfectly smoothed look.
Irish birthday cake.
SMBC is SO smooth and tasty. It is not overly sweet, which I love, and it can be flavored in so many ways (which I am hoping to experiment with soon!) The recipe I tried is from baker and decorator, Jennifer Bratko who runs a successful cake business in san Francisco, From Scratch SF. She is very precise and accurate in her recipes, making them nearly flawless. I've read through many of her blog posts about cake, butter, frosting, and decorating. I always learn something new. Jennifer's recipe for SMBC is made by whisking sugar, egg whites, and salt over a double boiler until it reaches a temperature of 160 degrees F. It is then transferred to a stand mixer fitted with a whisk attachment and whipped on high until stiff peaks form. The last step is to add 1 pound of room temperature butter to the meringue and to fit the mixer with a paddle attachment. The butter and meringue need to be mixed on the lowest possible setting until the butter emulsifies with the meringue creating a super smooth and light frosting. Here is the link to Jennifer's recipe and tutorial. Don't be afraid to try this one out! It will definitely change your opinion on buttercream.

Smooth top and sharp edges.
Since it is difficult for my husband and I to eat a whole cake ourselves, I made this cake for the friend of a friend's birthday party over the weekend. It was simple white cake with a vanilla bean SMBC. Everyone loved it and said that it was the lightest creamiest frosting they've ever tasted, success! Besides being so tasty, SMBC is actually much easier to decorate with. It smooths out very quickly and easily, giving a nearly flawless finish and sharp edges.

Wednesday, July 27, 2011

Summer Cakes

Summertime is a very busy time, leaving me busy with friends and family, and of course the occasional cake project. Here are some of the cakes I've worked on this summer.

The weekend of the 4th, my girlfriends and I baked 2 very opposite, but equally delicious cakes.


Chocolate Coca-Cola Cake with a vanilla glaze.
Angel food cake flavored with a hint of orange and served alongside fresh fruit and topped with a lemongrass simple syrup.  


The next cake was for my husband's boss's son. Most of my cakes just happen to be for girls with lots of pink, so this one was a bit of a challenge being that is was for a teenage boy who is into hunting. However, I think it turned out pretty well. The cake was red velvet and filled with cream cheese filling- as classic and delicious combination.

Hunting theme cake.


The last cake project was for a sweet little girl's first birthday party. Lot's of pink, purple, and polka dots which is completely what I'm used to. The bottom cake tier was confetti sprinkle filled with a pink buttercream and the top tier was chocolate cake filled with chocolate ganache. the pink chicks were handmade from fondant.

Baby chick cake.
Baby chick smash cake.
Cake, smash cake, and cupcakes.

Friday, June 17, 2011

Pillow Cake

First attempt at a pillow cake.
I've noticed that pillow cakes have become somewhat of a trend over the past few years. They're always so ornate, detailed, and pretty. It's really just cake that is either carved or baked into the shape of a pillow. Once it is decorated though, it truly does look like a stack of plush pillows.


The first time I saw one, my thoughts were 1. how does the fondant not just fall off of the cake (the picture I saw had a different color fondant on the bottom side of the pillow), and 2. how are they assembled so that the tiers are steady? I tried it on a cake for a class that wasn't for anyone, just in case there were some issues. Luckily, there were none! It turned out beautifully, and although there are some flaws in my embossing and the way I tucked the fondant underneath, this cake always gets people's attention.


I can't wait until the next time I do a cake like this now that I really have it figured out. The fondant doesn't fall off because it's draped over the top and tucked under, and the construction is steady because you stack pillow cakes the same way a regular tiered cake is staked, just with a smaller base.

Tiara topper is an actual hairpiece that was never used!

Thursday, June 9, 2011

One Year Ago

My husband and I were reflecting on the past year since I have started decorating cakes. I started in Spring 2010 by doing cakes for friends and to celebrate mine and my husband's first anniversary. Then, I never thought I'd be doing what I am doing now! I took classes in August 2010, and since then my skills (though not perfect) have developed so much that when I finish a cake- I shock myself! I cannot believe that I can look through photos online or at cakes in magazines and think, "Oh I could do that." I immediately think next, "Wow, I really could do that!"

It has been so much fun, and it truly is a blessing.

Here I just want to post some pictures of the first cakes I have worked on. They're not all pretty, but I had to start somewhere. My cake instructor always told me to save my first royal icing flowers I ever made- I never did because they were just too hard to store. However, I am so thankful I have pictures of my first attempts at cake decorating so I can look back and just see how far my skills have progressed.

Another thing that I am also glad that has progressed are my photography skills! I apologize for the poor quality of some of these photos. I am fortunate enough to have a husband who has taken the time over the past year to teach me how to use his Canon DSLR. =)

This was my first cake. Pink velvet actually. To my surprise- it worked! It was for a baby shower for some dear friends of ours. What I learned from this cake: an icing spatula would have made the job 10x easier!

These cookies too were for the same baby shower. Adorable? Yes! What I learned from making these cookies: I cannot write with frosting (in this case chocolate). I had 2 other friends do the writing and they did a fabulous job!

This cake was made to celebrate a friend's engagement (she's married now- congrats Lindsay!). What I learned from this cake: using a hint of lemon in a vanilla cake will make it taste more vanilla-ey. Yum!

This cake I made to celebrate our first wedding anniversary. I did not want to save our real wedding cake, and this tasted way better that the original would have anyway. Lemon raspberry with buttercream. What I learned from this cake: torting a cake isn't as difficult as it seems. I was surprised with my perfect layers.

I made this cake for my mother in law's birthday. Her favorite cake is chocolate cake with white frosting. What I learned from this cake: 1. Chocolate cake turns out better with the addition of sour cream. 2. Swan's Down cake flour is the bomb.

This was my very first Wilton cake. I made it week 2 of cake decorating class. It looks pretty cute, but the layers were a complete mess inside, they fell apart like crazy. What I learned from this cake: buttercream frosting can fix most mistakes.

This was my second Wilton cake. I impressed myself with this one. Vanilla cake, dark chocolate ganache, and orange mousse.What I learned from this cake: never over-whip butercream or it will be full of air pockets.


I made this cake for my friend's 18th birthday. It was lemon raspberry. I made all of those little apple blossoms by hand and they were perfect. What I learned from this cake: write on the cake first, then decorate around it, otherwise the text will get squished at the edge... oops!

This was another Wilton cake. Cute daffodils, huh? What I learned from this cake: always let royal icing flowers dry out overnight, or they will never dry.

I also learned that royal icing needs to be whipped for 7-10 minutes before use.


Well there is my cake decorating journey in a nutshell. It's been so much fun. The most important thing I've learned though is that anyone can do this. Really! It takes immense amounts of patience and practice, plus a steady hand, but it is a truly attainable skill.

Thank you to all my my very supportive friends who have given me endless encouragement since day one. I know I have filled your Facebook homepages with countless photos of cake, cookies, cupcakes, and chocolate, so thank you for your response and kind words.

Thank you to those of you who have actually paid me to make your special event cake. I always feel so honored when asked to make a cake for someone, especially since there are some fabulous bakeries around here! Thanks for the opportunity!

Thanks to my husband, who has stayed up late with me torting cakes and making frostings, and has thought up many ideas for many cakes I have made.

Finally, thanks to you blog readers. Not sure who many of you are, but I am always surprised to see my blog traffic even when I have not posted in awhile. It encourages me to keep going.


*Later this evening, I was looking through some older photos from 2009 ( I know this post is 1 year ago, but there were only 2 so I have to throw them in!) and came across 2 more early cake decorating projects. In 2009 I was a newlywed and had a lot of time on my hands- that is when the baking thing really got rolling.

Sugar cookies. I decorated these in summery colors just for fun to experiment with piping. What I learned from making these cookies: piping is A LOT harder than it looks.

Spice cupcakes with cream cheese frosting. What I learned from these cupcakes: close up photos of frosting and sprinkles are never a bad thing.

Tuesday, May 17, 2011

Ella's First Birthday Elephant Cookies


For Ella's first birthday, I was able to make these cute little elephant cookies.
Her family affectionately calls her Ella-phant, thus the pink elephant cookies with the number one on them.
The child is extremely cute with the sweetest smile. She's also the youngest of four, so she gets lot's of love from all of her siblings and aunts and uncles- lot's of love, and nicknames like Ella-phant. 


They are shortbreads iced with royal icing. Click here for my shortbread cookie recipe.

Derby Pie


I lived in Kentucky for just about 3 years. I went to school at a small Christian university just outside of Lexington. While living there I learned a lot about the people and their culture, and next to UK basketball, the Kentucky Derby is a pretty big deal. It's almost like a mini-holiday. Personally, I know how much of a sport horse racing is. My grandfather was a very accomplished pediatrician and race horses were his hobby. He owned several horses and named one after each of his grandkids. I remember attending races watching mine, my brother's, and my cousin's horses- Little Marikate Danny's-a-Honey, & Sun Shines on Kyle.

Why do race horses have such funny names? Those ones are actually quite "normal".

Anyhow, I remember going to those races. I remember hating having to dress up to sit at a noisy race track. I remember visiting the farms his horses were boarded at. I remember loving that part. I remember hearing stories of how my grandpa boarded horses at his barn before racing at the Derby. In all of my exposure as a child to the world of horse racing, I never heard of Derby Pie.


Of all places to eat Derby Pie, I was with my fellow education classmates getting ready to take a final exam for the Human Growth and Development course. The professor, Prof. Crook, had brought us all lunch, and for dessert: Derby Pie. Everyone who had eaten it before (Prof. Crook always makes it for his students before a final exam) was raving about it. Now I rave about it.

I had asked Prof. Crook for his recipe many times. I even brought him a recipe card to a class once to help him remember. It wound up taking him about 1 year to get it to me. It was a pleasant surprise when I finally got it though. My husband and I received his family's yearly newsletter around the holidays with a hand written note on the bottom of the page that read:
"The Derby Pie recipe is on the back. =) Finally."

Basic Pie Crust
• 1 cup all-purpose flour
• 1/2 cup all vegetable shortening
• 1/4 cup very cold water
• 1 tablespoon granulated sugar

Prof. Crook's Derby Pie
• 1 cup granulated sugar
• 2 eggs
• 1 stick butter, room temperature
• 1/4 cup all-purpose flour
• 1 tablespoon vanilla extract
• 1/2 cup chopped pecans
• 1/3 cup shredded coconut
• 1/2 cup chocolate chips

1. To prepare the pie crust combine the flour, shortening, water, and sugar in a mixing bowl and combine well using a pastry blender
2. Once the dough forms to a ball, turn out onto plastic wrap. Form into a disc, wrap tightly, and refrigerate 15-30 minutes. 
3. Meanwhile, prepare the pie filling by creaming the butter and sugar. 
 4. Add the pecans.
5. And add the coconut.

6. Set this mixture aside and begin to form the pie shell. Turn out the refrigerated pie dough onto a floured surface. 
7. Roll out the dough to an 11 inch circle. 
8. Transfer the crust to an ungreased pie dish. The easiest way to do this is to roll the crust over the rolling pin, and then roll it back out over the pie dish. 
 9. Crimp the edges with your fingers.
10. Fill the bottom of the unbaked pie shell with chocolate chips.
This would be my generous 1/2 cup of chocolate chips.
11. Pour the the butter and sugar mixture over the chocolate chips and bake in a 350 degree oven for 55 minutes. Let cool before serving.
Derby pie before baking...


Derby Pie after baking.
The top crust is crisp and flaky. Just below it's gooey and chocolatey.

This won't last long!